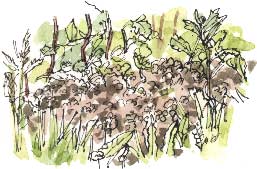
 FOUR
OR FIVE mole-hills appeared around the
meadow area a month ago. This one is surrounded by dog daisies, Yorkshire
Fog (grass), yarrow and
lemon balm (which spreads from the herb bed). A shoot of creeping
buttercup has already emerged from the loamy soil.
FOUR
OR FIVE mole-hills appeared around the
meadow area a month ago. This one is surrounded by dog daisies, Yorkshire
Fog (grass), yarrow and
lemon balm (which spreads from the herb bed). A shoot of creeping
buttercup has already emerged from the loamy soil.
Let’s hope that the mole doesn’t
take a liking to the adjacent veg beds; we can cover the beds with netting
to keep out the rabbits and pheasants
but how would I stop a mole?!
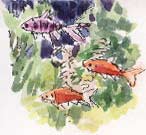
This morning, at the dentist’s, I had time
to do a pen (Stædtler mars professional) and watercolour sketch of the goldfish in
the aquarium in the waiting room.
Design your own Fantasy Island
Bryce 5.5, the 3D landscape design program now
marketed by Daz 3D, is
currently available as a free
download at download.com.
'Have you ever gotten the urge to take that nice 2d map you made
for your fantasy world and make it 3d?' asks Kemp Sparky,
'Or maybe you just want your Bryce landscape to follow those mountain ridges
and shorelines you crafted
so carefully.
Maybe
you even want to make a landscape from a book, like Tolkien's Middle Earth,
or McCaffrey's Pern. Well, then, this is the tutorial for you!'
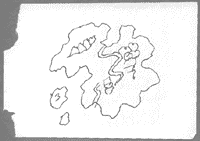
I'm fascinated by maps and I've always been intrigued by three
dimensional images so I tried it out Kemp's tutorial, Your
Conworld in 3D. Here's my quick version of the process:
 |
 |
 |
 |
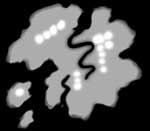
1. I sketched an island, including
rivers and mountains. |
2. In Photoshop I filled the surrounding
sea area with black.
As I'd drawn an unbroken line around the coasts this
was easy; I used the Fill bucket tool. |
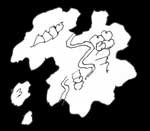
3. On another layer, using a reversed
selection of the sea (see the tutorial for full instructions),
I filled the island with
a medium grey, feathering and blurring
the edges
to give
a gentler
tonal
gradient.
The
mountains were dabbed in in white with a soft-edged
brush tool, the rivers painted in
black and then smudged along the edges to blend them in. |
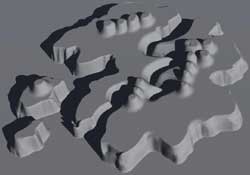
4. Open up Bryce and, once you've
added a terrain from the Create toolbar, go
to the terrain editor and load your saved greyscale
image (again, see the tutorial for details).
Go back to the main preview screen and press the Render button and you
get a three-dimensional version of your drawing. |
Scenic
Effects
 I find that magical; to go from a ballpoint pen drawing on a
scrap pad to a fully
three-dimensional model in 20 or 30 minutes. The end result reminds me of my
boyhood interest in model railways which was largely concerned with creating
papier
mâché coasts
and mountains as a scenic backdrop for the railway.
I find that magical; to go from a ballpoint pen drawing on a
scrap pad to a fully
three-dimensional model in 20 or 30 minutes. The end result reminds me of my
boyhood interest in model railways which was largely concerned with creating
papier
mâché coasts
and mountains as a scenic backdrop for the railway.
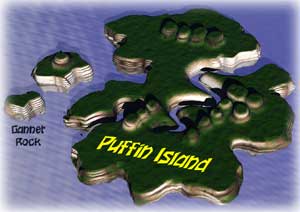
As with the model railways, the skill in Bryce comes in how you
finish your
landscape. I used to glue sawdust to the tops of my papier mâché cliffs
and paint it with poster paints to represent vegetation. With Bryce you can add
and modify
a huge variety of colours and textures and also add water, clouds, mist, fog
and lighting effects. Kemp goes a bit further in his tutorial than I did, adding
a
desert
area
to his green island.
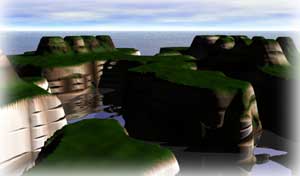
I like the way you can zoom in to corner of your model (right) and,
thinking of a use for all this tinkering about, you can save an image and,
in Photoshop, add captions (left).
I'm sure I'll think of a use for it some day . . .